Showing posts with label added light. Show all posts

Monday, March 16, 2009

To expand the cultivation areas


Today I've been standing in an open window, more than eleven yards over ground, and felt a bit dizzy. I've finally got around to start cleaning out my study-to-be where I'm going to work together with my plants (they are growing - I am writing). The first thing to do was to fix the venetian blind since its strings are broken. In Sweden the rule is that venetian blinds are put between the glasses in the doubble glazing (which nowadays are tripple glazing) and the strings are partly run in channels through the window. We do have some new string for mending purposes, but when I opened the window I saw that it was close to impossible to reach those spots you needed to reach if you wanted to restring the thing. That's when I fetched a wire cutter, cut the imporant pieces and removed the entire blind.

Why I felt dizzy? Well, I cleaned the window to get maximal sunlight for my plants, and I'm afraid of heights. Standing in an open window on the fourth flour made my knees rattle a bit.

Now I have an extra window for my plants, but what do you do if you don't have that many windows - or if you even more space for cultivation? You can put your indoor gardens anywhere in your flat, as long as you provide light. All begins and ends with the light.

To use the light you get from the window you can garden in levels. The first thing I'll do in my study-to-be is to put a shelving unit right in front of (behind?) the windowsill. This gives me some extra space to put plants in the lightest part of the room - as long as I'm placing them right. On the windowsill I'll put short plants, like babyleaves, and on the shelving unit I'll put taller plants - for the moment nasturtium and dwarf sugar snaps in big pots with trellises. During the lighter period of the year this could mean I could refrain from using grow lights. Still I'll put some flourescent tubes over the shelving units - I like being better safe than sorry.

If you are using added light - flourescent tubes or LEDlights - you can place your plants wherever you like. There are a few easy rules to this; use either full colour-, cold white or special lights for flowers, and the lamps should be placed ten centimeters (four inches) above the plants (the farther from the plants, the lesser good does the light do). Since plants do grow it's best to make sure that you can elevate the lamps every now and then. For my own part I'm using chains with links big enough to hang a s-hook in. This way it's easy to change the position of the light. Grant it, I seldom hang it unevenly, my inner aestetic screams when I try...

Another thing to think of is that you should be able to stand the light too. Plants want light for 12 to 14 hours, and you'll be in you home at least part of that time. In other words, if you put some cultivation areas in your sleeping room you need to set the timer to light the lights after you've left your bed - and idealy you should see to that you have a few hours without the grow light in the evening to get a more normal backlighting. Especially cold white light gives a scary lab feeling to the room, and you may want to curl up with a book and some candles without having to do a rampage through the technical stuff.

Those of you who have read Indoor Gardener regularly may notice something different on the picture above. It used to be cold blue light. The reason for this was thrift - ordinary flourescent tubes are much cheaper than special grow lights and work as well as them. But when I changed the tubes this winter I noticed that the manufacturer had released 'flower lights', which costs just as little as flourescent tubes, so I decided to try them. Could they really be as good as real growlights? As you can see they give a purple shine to the room, and plants are said to thrive in the red-blu spectra (red + bue = purple). Personally I like it, it's a softer light than the cold blue we had before. The plants looks healthy, so this may be an experiment with a positive outcome.

Wednesday, November 26, 2008

A few facts about grow light

Today's work was to empty the container I filled with water yesterday. My plan was to save it for the flowers, but the 'bath tub' prooved irresistible for the younger generation and when I found the cans for flowerwater already filled I gave in and fetched a siphon.

To get you something to read I tracked down a good page about grow light on the net. Little Greenhouse sell greenhouses (surprise) and have put some facts on their website. It's a clear and consise overview.

Indoor Plant Grow Light Guide


If you want added light and can't afford the lamps described you can use ordinary cold-white fluorescent tubes as bright as possible. They work almost as well and are far cheaper. I use them myself.

Monday, February 25, 2008

Where do I put it?


This is my miniature nursery. The triffids in the row front are Morning glories and Moonflower vines growing like weed. In the eggshells you find tomatoes from seeds I've collected myself growing together with carrots, chives and sallat 'Tom Thumb' (normally they are shielded by my giant glas bell, but this photo was taken while I 'aired' them). The plastic box contains six plants of Fedia cornucopiae thriving like crazy. The terracotta pots in the background is the plants I repotted more than a week ago. They don't do as well as the new seedlings, and I suspect they need more light. It's easy to plant, but now I do need to put up more lamps and build that nursery bench I made such nice plans for.

In about a week I'll sow a new row of seeds. Then I have to move my first plants somewhere else. I already eye the best windows and count the flouroscent lampfixture I have (one). The thing is that the best window is placed two meter (2.2 yards) above ground and have a pointy top. I can't use the normal procedures for putting up a shelf and hang the lamps from it. But I have a plan! Tomorrow I'll balance on a stepladder while I screw brackets to the wall. Or, I may change my mind and use our plunge router for the first time. In either case: pray for me...

Tuesday, November 27, 2007

Winter


You won't stand free from seasonal changes, even when you are growing stuff indoors under plant lights (as I said before). My lemon balm growth has slowed down to a fourth of the summer pace. On the other hand its leaves are much darker.

Thursday, March 29, 2007

Progress at the end of March


I took a look at my purslane seedlings the other day and realised that quite a few of them had fallen. The bigger part of their lines looks like Uppsala students the last day of April*. Only a few plants close to the window seemed to be thriving.

Hmmm....

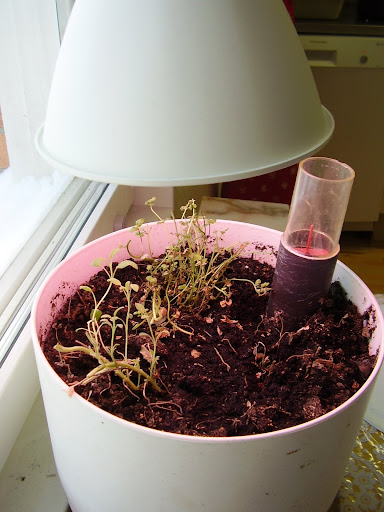
Was there anything wrong with the grow light? I didn't need any special machine to find out what was lacking. I put my hand under the armature. The lamp was shadowing the plants from the sunlight. We may be in the last days of March and the sunlight reaches amounts close to tropical, but I do expect more 'bite' from a grow light. I've myself to blame, currently I'm using the flourescent light that was enclosed with the armature, and that was not meant to be a grow light in the first place, plus it's rather old. My new quest is therefore to get out there and buy a bright full colour flourescent light.

In the last days of March I'm adding outdoor gardener to my identity. My balcony is starting to come alive. Every day I walk out and take a look at the different buds. You may recall that my mints and lavendar have died - sic transit gloria mundi. The strawberries have survided, though, and needs some weeding and general shape up. The leaves have brown brims, which is a bad sign, but I hope to find some way to make them thrive anyway. What makes me most happy is that my big ones seems to have survived. The buds of both my roses are swelling, and soon they will be leaves instead. The same is happening to the cherry tree that I'm giving a close study every day. Can I hope for home grown cherries this autumn?

*In Uppsala the last day of April is celebrated with "sillfrukost" (breakfast with pickled herring, small glases of strong liquor are more or less required to this), champagne gallop down Carolina Rediviva hill at noon and spring ball in the evening. Not all students are making it all through the day.

Tuesday, March 27, 2007

Grow light for beginners

Grow light is a good thing to have when you are gardening indoors. If you're not buying that, take a look at the photo series on my small sage and mint garden. Today it looks like this:


In the beginning it looked like this. The plants had survived a long swedish winter in one of our darker windows.


After a few days with grow lights, it looked like this.


And now I have mint enough to drink tea made from fresh leaves several times a week, and have problems finding purposes for my amounts of sage. Clearly an indoor gardener, at least an indoor gardener with the ambition of growing eatable things, cannot do without extra light. But why?

The reason is that the plant need three things to survive; light+water+soil (ie. nutriants from...). It needs light of the right amount and quality in the same way it needs nutriants of right amount and quality.

During the summer in Sweden (we are roughly at the same longitude as Canada) most plants are doing pretty well since we have almost the same amount of lights as in the tropics. In the winter, however, we have only a third or in worst case a twohundredth part. Our human eye cannot register those big differences, but the plants do - and starves.

If you are gardening indoors you need to think both of the right amount of light for the season, and the right quality of light. Roughly light is divided into red and blue, where red gives long plants and blue compact and leafy ones. Gardeners deep into this field has long ago lost themselves into the world of lux, lumen and LED. I might join them in the future, but today we're looking at the basics.

The easisest way to get good light is to visit the apropriate chain in gardening or hardware or do it your self. I bought mine at a swedish hardware/do it yourself chain. When you find flourescent lights neetly labled "grow light", buy it. If you want to grow in big pots, buy a long 'normal' flourescent light and the appropriate armature.

Now, grow light tend to be expensive, so it may come as a relief that if you are keeping your plants in your windowsills you can make do with complementing the sunlight. In that case you can buy normal full colour flourescent light.

The last part was interesting for me. My instant herbgarden and sow box are endowed with a futuristic bluewhite light. Eventhough it's been up for several days I haven't noticed any difference like I did with the sage and mint. I guess the light is of inferiour quality, which means I have to change. Full colour light will dig a hole in my budget, but a far smaller one than 'real' grow light. I'll update on this subject.

Tuesday, March 20, 2007

Progress so far


Here we can see my little seedlings, looking at themselves in the window. They don't seem to have noticed the added light, so I have lowered the lamp at their half of the window. The tilted armature gives our library a somewhat anarchisitic look, which in a way adds to the austere book cases. I'm not a friend of too much order.

Today I had to fill the magazines in my homemade selfwatering containers, and I'm overjoyed! This means they are working like they should. The box with the instant herb garden was empty, whereas the seedling box had a few drips of water left. I took the risk of giving both herb garden and seedling box fertilizer to see what impact it'll have.

And my carrots have surfaced. Jay!

Sunday, March 18, 2007

Space-ious


This afternoon I opened the micro and found the milk my hubby warmed for me for elevensis (our forenoon snack). We've had little sleep these last days.

When I'm feeling soggy like this I do handywork, which means I spent the day putting up the added light for my little indoor garden. It's about time. The little purslane and turnip seedlings has reached for the light so much that they almost lay horisontal over the soil.

Setting up this lamp involved drilling, tampering bolts and electricity work. I'm as happy as a kid when I manage to do things like that and feel like a Super Strong Woman (tm). The fact that my son said one of his first two word sentences made it even better.
"Mom drilling."

Now I'm savouring this, looking out over an indoor garden that has truly reached space age.

Friday, March 16, 2007

Little things...


Today has been a Big and Serious Study day (tm), which means I haven't been able to do much with my garden. The good thing about studies is that you have to move around every now and then to prevent falling to sleep over the keybord. This is a the ultimate incentive to, for exemple, clean up the balcony after the winter. Our two HOL benches bought at IKEA last year have started to disintegrate, so I finished the process quickly and put the remnants inside to dry (I'm planning to make toy storage out of them for my son - I guess I have to start a new blog recording my interior design projects). I checked the roses and put the stuff I've stored in the HOL benches into plastic boxes instead.

The shelf for the added light is up, did it meself - mostly. It's become the perfect place for my geraniums. The garden geranium that was given to me when we moved here needed some water and general care, as well as the cuttings from my "Avatar of Roses" - a scented geranium I like much. They had formed roots pretty nice and should have been planted in soil long ago. Very long ago. In fact several months ago. The pot was filled with muck and the surface of the water had started to mold. So I cut the tips of the cuttings and placed them individually in new pots. Their leaves were light green with darker nerves, and I suspect they've lost their "body fat" (or whatever it's called on a plant) due to their long time in water. As an experiment I added two drops of liquid fertilizer to two of the pots. This will probably make some algae happy, but I hope the nourishment will be of benefit for the cuttings too.


A tip from Colleen made me remove the plastic from my little kitchen garden. Turned out that eventhough purslane and turnip had put up their little leaves the carrot still stays under the surface. Note to self; sow carrot in a separate container from now on. Let's see if this round grows anyhow. In other case, well, I prefer turnip to carrot every time...

Tuesday, February 27, 2007

Back to the roots

This image is called "just off the turnip truck"
Photografer is Darwin Bell, you find more of his images here
.

Since my added light projects proceeds in a very slow pace I spend the 'lost' time researching the crops I've bought. You've already seen the result twice, since I've published small articles on common purlsane and ice plant on this blog. Now it's time for the different roots. I like roots. They're nutricious, can be harvested early and stays fresh for a long time. On the other hand I wasn't so sure that I could learn something more about them. The tiger nut are indeed exotic to a swede, but the turnip seems common enough. And the carrot! Is there anything worth to add about the carrot?


I always do my research on the net, using Goooogle and the common swedish name of the plant. As soon as I find a reliable latin name I do a new search on that. This is the best way to find reliable sources. Because the net is littered by plant heads, romantics and wannabe herb gurus, and you need to distinguish between them and the reliables. Read the reliable ones first to have a solid base of knowledge when you go on to read the articles written by plant heads, romantics and wannabe herb gurus. These are often more fun, and may contain some grains of truth.


Indeed, there were quite a lot to say about both turnip and carrot. There's even a museum dedicated solely to this orange root - I'm not at all surprised that there are englishmen and women involved. I'll publish my collected efforts on this blog during the week.


Happy gardening!

Friday, February 23, 2007

Added light for windowsill, part 2

Having proved that I am woman enough to fasten things to the walls I asked my hubby to put up the other bracket.

To be continued...

Thursday, February 22, 2007

Added light for windowsill, part 1


My son is ill. This means that I spent the for noon at home together with hubby and offspring. This was a coincidence too good not to be used in some way. Since I keep everything I need at home for putting up added light for an entire windowsill, fluorescent lamps, armature, chains for hanging the armature and bracket to fasten the chains in something - to make the lamp shine on the right spot you have to fasten it in something a bit away from the wall. This I discovered when I put up the added light for my herbgarden, and had to use some more rustic methods.

I started by opening the armature and stare mystified at the contents for a while. It isn't that hard, everything is colour coded, you have a short and helpful manual and the only thing you really need to worry about is one lamp and one cord. But the presence of hubby triggered my bad confidence in handling mechanincs and heavier crafts. I think it's something that is impressed on girls through simple and double messages all through the years. And hubby was walking around discretely eager to be of help, if only to put a battery into its recharger. The urge to ask him almost overpowered me, but neither hubby nor I did yield.


The armature is made for moist places, like djungles and the bathrooms of teenage girls. This means that the cover has strong clips and and packings, plus two rubbergizmos meant to seal the hole for the cord. All of this were packed in a plastic bag together with some extra clips as well as packings for the attachments. According to the manual two screws should have been packed too, but I didn't even find a glimmer of them. Perhaps this is a good thing, since I'm about to hang the lamps in chains I was going to use steel loops anyway. If I ever need to seal the lamp completely I plan to use some silicone rubber.

One of the big problems was the shelf. The brackets needed to be placed on such a distance that I can't hang the chains directly from them. It's not estetic to have chains hanging diagonally when their only function is to hold a lamp! A simple solution to the problem is to place a shelf on the brackets and fasten loops under it for the chains and the cord. Unfortunately we didn't have any piece of plank long enough for this purpose. My thoughts went to the discarded indoor rails we keep on our attic, hubby suggested a broom stick.


Broomstick it was, then.


Time to get some work done. With a bracket in one hand and a ruler in the other I climbed a chair from IKEA to meassure exactly where I should put the bracket. I wanted the bottom side of the shelf to be in line with the windowframes. In that way I thought I would get an horizontal shelf. Turned out that our windows are not in line with each other. We live in a house built in the 80s when desing was in, but not building up to standards. I used a few foul words while fighting the ruler to get a line that at least would be visually logical. Hubby wondered why I didn't marked the holes where I should drill - and I asked why when I only needed a line to aim after.

Time for the cordless screwdriver. Looking at it I instantly imagined bloody mishaps and emergencies and secretly hoped for hubby to offer his help. He didn't. What we did do was to localise the supporting frames for the walls. They have sucked small amounts of moist into the plaster boards to the extant that our wall papers are striped with grey on their places. Quite practical on occasions like this. The point was to screw directly into the frames instead of using special gizmos to make the screws hang on to the plaster. Yeeha! I could use the frames. This shelf will stay put.


Back on the chair, bracket against the wall, the screw in the bit (that is magnetic) and then I screwed directly into the hole in the bracket. Well, halfway through I discovered that the bracket was som tiny that the screwdriver actually tipped it a bit. The whole thing was skew, and da rned how the mechanincs worked slow! I jumped down to fetch our small, flexible screwdriver - which proved to be even weaker, of course. The non mechanical one was a joke! My helpfull hubby added an extension to the big one, and I could work again. Except for the last hole, where the supporting arm of the bracket was placed in front. What is the reasoning behind a construction like that? "We put a hole here for a fastening screw, but let's make it purely ornamental"? Above that I managed to drill out the treads in the screw by being to squeemish in pressing on while screwing.


BAH! That's what you get trying to prove your competence!


Finally I had fastened the screws, all three of them. Well there was half an inch left for the last one when the screwdriver said.

MeeuuuUUUUUUhh!

Battery's out, and no extra to use.

I told my hubby that putting a battery in the charger was so easy that even I could handle it, and put the battery in the charger. Then I returned to contemplate the lamp. I unpacked the things in the bag, read the manual thoroughly, squeezed the rubber thingys gently. This seems to be easy. I only need to drill a hole for the chains. Explains to hubby what I am about to do. He agrees to my plans - good, saves me a lot of fuss. Then we take out our foldable working bench and I fasten the cover in that. I take the opportunity to fasten the loose clip too.


The battery has been in the charger for a while. I fit it into the screwdriver again, hubby gives me right drill and I press it to the cover. Askew again, I pause and correct the position before the plastic has been to damaged. Drill against the cover, a better grip on the screwdriver and....

MeeuuuUUUUUUhh!

Not much use in that battery.


Hubby concludes that this work isn't meant to be done right now. I agree. It's some kind of sign. So my report on this work so far is; after half a days work I've managed to put up one (1) brackett.

Sunday, February 11, 2007

My little herb garden - an update


I thought I would post a picture on how my herb garden  has 
developed after two to three weeks of added light. The sage 
and the mint have both sprouted new and greener leaves, perhaps a bit 
smaller than they should, but they are definately on the right track. 
The mint are eagerly trying to crawl over to the empty space where 
I'm planning to sow basil - given I can find my basil seeds again.

If you don't remember how my herb garden looked like before I'm 
reposting a picture where the withered leaves and such recently
have been cut, and the additional light have been up for only two days.

Saturday, February 10, 2007

Successes so far

I'm of the firm belief that analysing successes are more important than analysing mistakes


*I added extra light – apparently it's pretty dark, even in the windowsills since the sage and mint are growing in a completely different way ever since I put up the plantlamp.


Hm, this list of successes was short. My goal is to have other proportions on my analyses in the future; the mistakes shall be in singular and the successes shall be legio. Furthermore, prepare yourselves for a picture series on how I'm assemble, decorate and put up flourescent lamps to widen my growing space.


Decorate? You can't imagine how uggly they are, and I have to live with them...